
Our Shear & Clipper Blade Sharpening Process
Professional sharpening is not a one-size-fits-all process. A pair of grooming shears, a set of fabric scissors, a thinning shear, and a clipper blade may all be cutting tools, but they are built differently and need to be sharpened differently.
At Precision Sharpening, we start by identifying what we are working with and how that particular tool was designed to cut. From there, we choose the appropriate equipment, sharpening geometry, abrasive, cleaning process, and testing method. The goal is not simply to make an edge feel sharp; it is to restore the tool's intended cutting geometry while removing as little material as practical.
That distinction is especially important with professional shears and clipper blades. These are tools that should be sharpened many times throughout their useful lives, so unnecessary material removal can shorten the life of the tool. Proper sharpening should restore the edge while preserving as much of the original tool as possible.
Shear Sharpening
The first step with any shear is determining what kind of edge it has. Professional shears generally fall into two broad categories: beveled and honed (convex). Although these terms are sometimes used loosely, they describe meaningfully different blade geometries and require different sharpening methods.
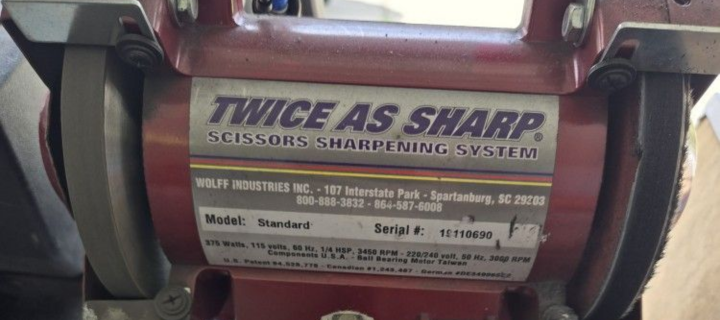
Beveled shears have a relatively flat, defined cutting bevel leading to the edge. These can be sharpened efficiently on a Twice as Sharp, a specialized scissor-sharpening machine. The machine uses a fixture that allows us to set the appropriate angle for the shear and maintain that geometry consistently across the cutting surface. Many beveled shears can be sharpened without completely disassembling them, which makes this process relatively efficient while still allowing us to establish a consistent edge. A beveled edge is not inherently inferior to a honed or convex edge. It is simply a different design, and there are still plenty of professional grooming, fabric, and general-purpose shears manufactured with beveled edges.
Modern professional grooming shears, however, are very often honed (convex) rather than beveled. This is particularly common with higher-end Japanese-style shears. A convex edge is created through a more gradual, curved geometry away from the cutting edge rather than the clearly defined flat bevel of a conventional shear. The inside of the convexed blade also has a steeper hollow ground geometry that allows the two blades to glide along a ride line as they close. Honed/convex shears require a much more involved sharpening process. We use our Hamaguri flat hone for this style of scissor, and every pair is completely disassembled so that the blades can be sharpened independently. A specialized clamp is used to maintain the correct geometry consistently along the edge rather than relying on free-hand technique, which (without skill) can lead to incorrect angles that cut poorly.
The distinction matters because a honed shear should not be ground at a harsh bevel simply because a beveled edge is faster and easier to produce. The smooth cutting action, the quality of the cutting results, the lifespan of the scissor, and the longevity of the sharp edges you rely on, all suffer when a honed shear is sharpened incorrectly. If you send us a beveled shear, you get a beveled shear back. If you send us a honed shear, you get a honed shear back. We identify the manufacturer’s intended geometry and sharpen the equipment appropriately.
This means that we also repair honed shears that have previously been beveled by another sharpener. If the construction of the shear indicates that it was intended to have a honed or convex edge, we assume that is how you want it returned unless you tell us otherwise. Restoring that geometry can require additional work and material removal, but preserving the intended design of the shear is part of proper sharpening and allows us to guarantee optimal results.
Straight, Curved, and Specialty Shears
Straight and curved grooming shears are sharpened using the same basic principles. Our standard grooming shear cutting edges are generally sharpened at 47 degrees, with the appropriate fixtures and equipment used to maintain the geometry across the cutting surface.
The exact geometry is always determined by the construction of the shear rather than blindly applying one angle to everything that comes through the shop. The fixture helps us maintain a consistent position and sharpening angle as we work across the blade, which is particularly important on long shears where even a small change in geometry can affect how the blades interact.
Thinning shears, texturizing shears, chunkers, and blenders require a different approach because they have both a cutting blade and a toothed blade. The smooth cutting blade is sharpened at 35 degrees. That angle applies to the cutting blade, not the teeth.
If the tooth blade needs to be sharpened, we generally use approximately 25 degrees and a lower grit so that the teeth retain some of the grip they need to function properly. The objective is not to make both blades equally smooth and sharp; the teeth are there to interact with the cutting blade and remove a specific amount of hair with each closing motion.
Some texturizing shears have teeth that are essentially serrated rather than individual teeth that can be conventionally sharpened. Those cannot necessarily be sharpened in the same manner as a standard thinning shear. Attempting to grind a serrated tooth pattern can alter or destroy the geometry rather than restoring it, so we inspect specialty shears before deciding what process is appropriate.
Testing the Finished Shear
Sharpening does not end when the edge comes off the machine. A shear can have a beautifully polished edge and still have a burr or some kind of problem with its blade interaction, adjustment, or overall condition. That is why we test the finished shear according to what it was designed to cut.
Dog grooming shears are tested on hair or rabbit fur, which provides an effective comparison to pet fur that reflects how the shears will perform on the job. Fabric shears, particularly those that give us reason to question their performance, are tested on actual fabric such as fleece, flannel, or vinyl. Hairdressing scissors are tested on real human hair and then tested on a single layer of thin, wet tissue, because only perfectly sharpened and honed shears can cut through a thin layer of wet tissue without folding and tearing it.
Testing gives us one more opportunity to catch a problem before the shear leaves the shop. It also lets us evaluate the finished tool as a cutting implement rather than assuming that a sharp-looking edge automatically means a successful sharpening. That is an important distinction throughout our process: we sharpen tools for what they are supposed to do, not simply for what they look like under a light.
When a Shear Has Reached the End of Its Life
Not every shear that comes into the shop can or should be sharpened. Professional shears have a finite amount of usable material, and repeated sharpening gradually changes the physical dimensions of the blades. At some point, removing more material will no longer solve the underlying problem.
One common example is excessive blade gap. The two blades need to meet correctly as the shear closes. If they have become too far apart, there may not be enough material or geometry remaining to correct the problem through sharpening. Continuing to grind the blades at that point would only make them smaller without actually restoring proper function.
We also inspect for significant damage, excessive wear, altered geometry, and other conditions that may make restoration unsafe or uneconomical. When a shear has reached that point, we will always tell you that the tool should be retired, rather than charge you for sharpening that can never return the tool to a proper working condition.
Clipper Blade Sharpening
Clipper blades are an entirely different type of sharpening job.
Their cutting surfaces are manufactured with a specific hollow-ground geometry, and that geometry needs to be maintained (or restored) rather than simply putting a flat, smooth edge on the blade. Our clipper sharpening process is based on the same basic hollow-grinding principle used in manufacturing, using specialized tapered plates designed for clipper blades.
We use two different honing setups depending on the type of blade being sharpened. One is a Nebraska Blades hone, which we use with 100-grit aluminum oxide abrasive for livestock blades. The other is a clipper hone personally built by Craig, the original owner of Precision Sharpening, which we use with 220-grit abrasive for regular clipper blades, wide blades, 5-in-1 blades, and similar blade types.
Craig was a machinist before he became a sharpener, and that background is reflected in the hone he built. It is a purpose-built machine designed around the requirements of clipper-blade sharpening and performs on par with many of the major commercial honing systems.
Using different abrasive grits allows us to match the sharpening process to the blade. Livestock blades generally require a more aggressive abrasive because of the amount and type of material that needs to be removed, while our standard 220-grit process allows us to restore regular clipper blades without unnecessarily removing material.
From Disassembly to a Finished Blade
Every clipper blade begins by being disassembled. The individual parts are kept together in aluminum trays so that the components from different blades do not get mixed.
Once disassembled, the blade components are cleaned and blown off with compressed air before sharpening. This removes hair, oil, dirt, and other debris that could interfere with the functioning of the spring or bog down the screws. We check to see if the plastic blade guide is still firmly seated on the spring and doesn’t slide back and forth too easily (this can cause vibration and noisy operation) and we replace the guide with a new one of the correct size and fit. The socket is then adjusted with a steel block and a pair of square jaw pliers to ensure a snug fit on the hinge of the clippers. Next, we tighten the spring with a pair of small pliers to ensure the blade is properly tensioned when we reassemble it later.
The cutter and comb are then sharpened on the clipper hone until the entire cutting surface has been restored to a fresh edge. Most blades only require a very small amount of material to be removed during a normal sharpening. Typically, we remove approximately 0.001 to 0.002 inches of material, or 1 to 2 thousandths of an inch. That is less than the thickness of a human hair. The small amount of material removed is intentional. A clipper blade has a finite service life, and there is no benefit to grinding away substantially more metal than necessary to restore the cutting surface. Controlled material removal allows us to sharpen the blade while preserving as much of its remaining useful life as possible. This is why flat-grinding or severe rusting is so bad for clipper blades, because it requires significant material removal to restore a sharp cutting edge, the equivalent of sometimes ten or more normal sharpenings. Instead of four to five passes on the clipper hone, it can take upwards of forty passes to get through severe pitting or a completely flat grind.
Once sharpening is complete, the components are cleaned again. We use an ultrasonic cleaner to remove the fine metal and abrasive debris left behind during honing. Ultrasonic cleaning is particularly useful for clipper blades because it can remove material from small areas and components that are difficult to clean thoroughly by hand.
We also use ultrasonic cleaning for surgical equipment as part of its preparation for sterilization once it returns to the clinic. Regular shears are handled differently. We do not put our standard shears through the ultrasonic cleaner; they are hand-wiped with a soft cloth. Small scissor components are cleaned in an alcohol solution as appropriate, then wiped with a hand towel.
Once the blade components are clean and dry, they are oiled and reassembled. The top cutter is aligned with the comb, and the spring tension is checked. Alignment is an important part of the finished blade because a cutting edge can be perfectly sharp and still perform poorly if the components are not positioned correctly relative to one another.
Finally, the blade is tested. We use a specialized test string for our standard clipper-blade testing, which is the same type of material used in factory testing. If a blade has been identified as a problem blade or otherwise needs additional verification, we test it on rabbit fur. If it can successfully cut rabbit fur, we have considerably more confidence that it will cut normal animal hair.
Clipper Blade Repairs and Replacement Parts
Sharpening can sometimes reveal problems that have nothing to do with the cutting edge itself. Clipper blades contain several small components that can wear or become damaged, and we replace parts as needed. This can include springs, guides, sockets, and screws. A blade that initially appears to need replacing may therefore be repairable once the individual components have been inspected.
There are limits, however. A broken tooth on the comb can present a hazard to the animal or person using the clipper. A blade with broken teeth cannot always be sharpened and returned to normal service. Luckily, quality replacement combs are available for many blades. We can replace the comb on any common (non-skip tooth) blade from a #50 to a #4F, with some wide combs available as well. Other blade types generally do not have replacement combs available. Replacement cutters and small parts are more universal and, therefore, likely to be available.
If you are unsure whether a damaged blade can be repaired, it is always worth asking before replacing it. Sometimes a relatively small component is all that stands between a blade and a second life.
When a Clipper Blade Is Beyond Repair
Unfortunately, not every blade can be saved.
A blade may be damaged beyond reasonable repair, have broken teeth that cannot be replaced, or may have reached a condition where restoring it would no longer be practical. When we determine that a clipper blade has been condemned, we mark it with a large red X so that it is immediately obvious that we do not recommend returning it to normal service or sharpening it again. The same principle applies to shears that have reached the end of their useful life.
We would much rather be straightforward about a tool that is finished than remove more material simply so we can say we sharpened it. The purpose of sharpening is to return a useful tool to service, not to keep grinding until there is nothing left.
Cleaning, Oiling, and Packaging
Once sharpening, repairs, and testing are complete, the tools receive their final cleaning and preparation.
We oil tools before they are returned so that they are ready to use when they arrive back in your hands. Convex shears and clipper blades are generally placed in protective poly bags, often with a small amount of oil to protect the freshly sharpened surfaces. Fabric shears are generally protected with heat-shrink packaging.
Our goal is for your tools to arrive clean, protected, and ready to go back to work rather than looking like they just came out of a grinding shop. That final preparation is a small part of the overall process, but it is part of treating sharpening as a complete service rather than simply an edge-grinding transaction.
Why Our Process Looks Different From Tool to Tool
There is no single process or sharpening machine that can correctly sharpen every type of shear or clipper blade. A beveled shear requires a different methodology from a convex shear. A thinning shear has different requirements from a straight shear. A livestock clipper blade requires a coarser abrasive than a standard grooming blade. A fabric shear should be tested on fabric, while a hairdressing shear should be tested on actual human hair.
The equipment matters, but understanding why we are using that specific type of equipment matters more. Our shop uses a Hamaguri system for honed and convex shears, a Twice as Sharp for beveled shears, a Nebraska Blades hone for livestock clipper blades, and Craig's purpose-built clipper hone for our regular clipper blades and similar blade types. We use fixtures to maintain consistent sharpening geometry, different abrasive grits according to the material and amount of work required, ultrasonic cleaning where it is appropriate, and application-specific testing before the tool leaves our shop.
We do not believe that the most aggressive grinder or the fastest process is automatically the best process. A good sharpening removes what needs to be removed and preserves everything that does not. That becomes especially important when you are sharpening an expensive pair of grooming shears or a clipper blade that you depend on every day.
Our Sharpening Service
You are always welcome to bring your tools to our shop in Shelley, Idaho, where we can inspect them in person and discuss anything unusual with you. We also accept mail-in sharpening orders for customers who cannot make it to the shop. Check out our dedicated page for our mail-in options.
We stand behind our work with the Precision Guarantee, which covers our sharpening for 30 days. If there is a problem with our work during that period, let us know. We will inspect the tool and work with you to make it right.
Our goal is not merely to return a tool that is technically sharp. We want it to perform the way it is supposed to perform for its intended use and to restore a tool that someone depends on to do a job well.
